Did you know a heat pump thermostat can save up to 30% on your heating bill? With the help of a heat pump thermostat and some DIY wiring, you can save quite a bit on your heating costs. The savings are that significant because a heat pump thermostat monitors the temperature in multiple zones rather than just one spot. It means it will only turn the heat on where it is needed. Most homes have standard programmable thermostats, so they aren’t capable of operating with a heat pump or other advanced cooling systems.
So if you’ve recently upgraded to a heat pump and need new wiring to make everything work smoothly, read this article for helpful tips about how to wire a heat pump thermostat.
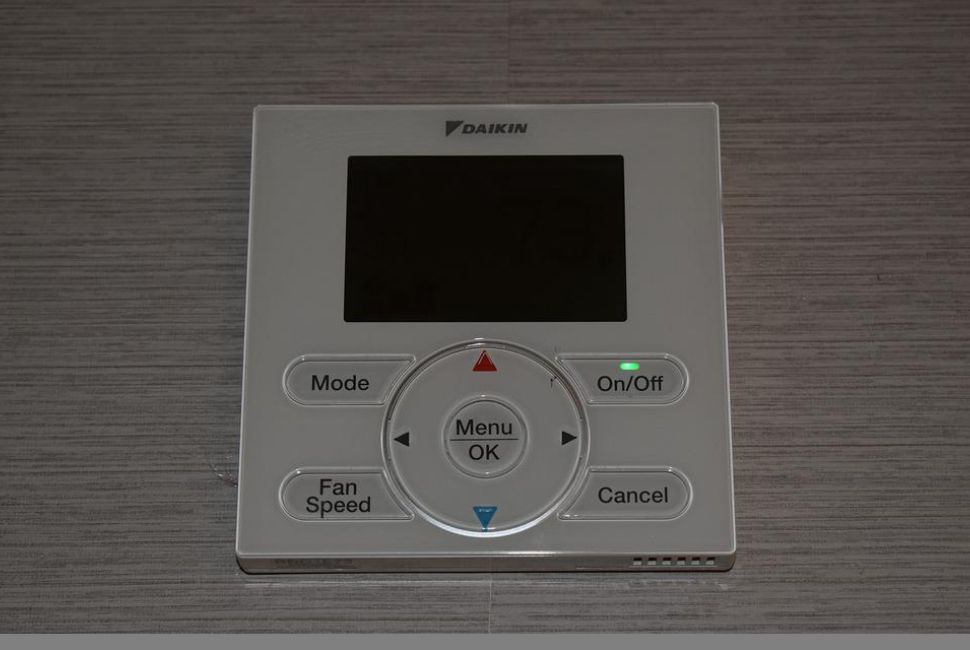
Heat Pump Thermostat Wiring
A heat pump thermostat is a device that regulates the operation of a heat pump, a mechanical device that moves heat from one location to another. The thermostat controls the heat pump’s operation by turning it on and off and regulating the refrigerant flow. The heat pump is usually located in the home’s living space and connected by wire to the heat pump.
The thermostat wires have a set of terminals connected to the heat pump’s control board. The control board’s terminals correspond to the thermostat terminals labeled with letters and numbers. Its control board has screw terminals connected to each wire with a color code.
Usually, a 24V AC power supply from a 110V/24V power transformer powers an electronic thermostat in the United States. Be sure to consult your thermostat’s operating manual before performing any repairs or troubleshooting. You should have a qualified technician do it if you’re not trained to work with electrical equipment. It’s always a smart idea to take a photo of the current thermostat wiring before you start removing it.
There are at least 8 wires that must connect to the thermostat for a heat pump system to operate correctly.
How to Wire a Heat Pump Thermostat
If you are looking to wire a heat pump thermostat, there are a few things that you will need to keep in mind. First, you will need to ensure that the unit turns the power off before you begin. Otherwise, you could put yourself at risk of an electrical shock. Once the power is off, you will need to remove the front panel of the thermostat so that you can access the wires. Once you have access to the cables, you will need to identify which wire it is. The wire colors will typically be different, so this should not be too difficult.
Once you have identified the wires, you will need to connect them to the corresponding terminals on the thermostat. Make sure that the connections are tight so as not to come loose. Once the wires are connected, you can replace the front panel and turn the power back on to the unit.
It powers your heating and air conditioning system by connecting it to the compressor. You can revitalize your heat pump system by turning it on to the internal heating tape. The heat pump’s thermostat controls the whole operation. It operates in conjunction with the appropriate thermostat manufacturer’s algorithms to determine the best times and durations. The thermostat controls the indoor fan’s speed, the heating rod’s power, and the heat pump’s heating level.
You may adjust the thermostat’s control parameters via the switches available from each thermostat. The heat pump’s installation instructions and the heating tape provide the information.
Things Needed to Wire a Heat Pump Thermostat
To wire a heat pump thermostat, you need a few tools and materials. First, you will need cutting pliers and wire strippers. Next, you will need to identify the wires coming from your heat pump. There should be red, white, and green wire. Once you have located the wires, you will need to twist the ends of the wires together and then use the cutting pliers to tighten the connection. You will also need plastic cable ties to hold electric cables or wires together.
Thermostat Wiring Color Codes
Most thermostats are color-coded. White, green, yellow, and red are the most frequent colors. The colors indicate the function of the wire and will guide you when doing the wiring.
Thermostat Green Wire (“G” Wire)
The green wire is for the fan on an indoor air handler; the “G” wire regulates the power input.
Yellow Thermostat Wire (“Y1” And “Y2” Wire)
The Y terminals are for connecting to the compressor relay. They frequently link to the indoor split-system air handler (Y1). We typically use yellow-coded Y wires for single-stage cooling, which most of us have in our homes. This terminal is only necessary if you have a two-stage air conditioner and two compressors. Y2 is for two-stage cooling only.
Other Wires (BK, RS1, RS2, ODT1, ODT2, AUX NO, AUX C, AUX NC)
Other wires connect the various parts of the system. These include the backup (BK) wire, the remote start (RS1) wire, the RS2 wire, the ODT1 wire, the ODT2 wire, the AUX NO wire, and the AUX C wire, and the AUX NC wire. Each of these has a specific purpose and is responsible for a different function within the system.
Wiring Diagram
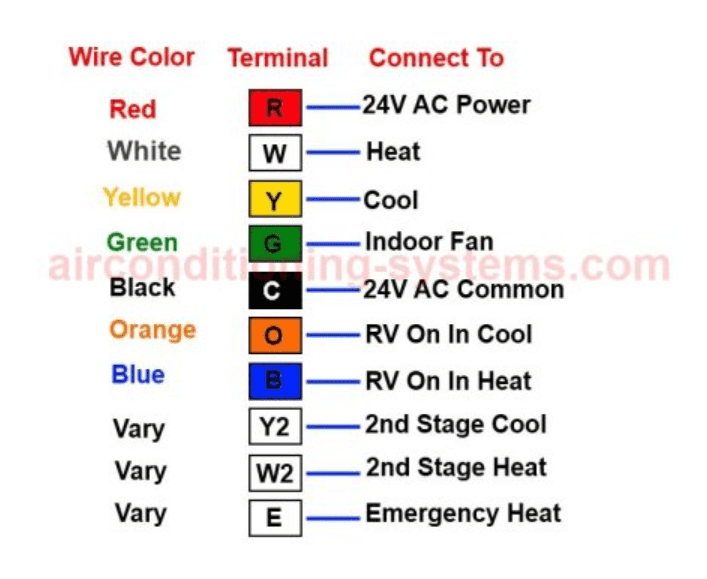
Reference:https://www.airconditioning-systems.com/heat-pump-thermostat-wiring.html
Variants for Connecting a Heat Pump Thermostat
There are many different ways to connect a heat pump to the thermostat, and the specific method you use will depend on the type of heat pump you have. The most common type of heat pump is an air-source heat pump, which uses the air outside to heat and cool your home. Other types of heat pumps include ground-source and water-source heat pumps.
Before the heat pump system begins to defrost, a backup heating source is required. Electrical tape heaters are the most common backup heat source for heat pumps, followed by gas ovens. If you use two heating methods, you may need to connect your heat pump to a separate thermostat.
Heat Pump Wire Labels
A heat pump wire label is a label that is placed on the wire of a heat pump by a manufacturer. The label indicates the wire size and amperage rating of the heat pump. It also has the manufacturer’s name and the date of manufacturing.
Many modern thermostats require a C-wire to function correctly. The C-cable generally used for 24 V thermostats is supplied from the control transformer and the R-cable. You can use a 4-wire HVAC system control transformer to control the system. The transformer has one side connected to the mains voltage, and the other side provides a 24 V control voltage.
There are two types of control relays, including the control relay and connection. To enable this is to connect the thermostat to the Cable R.
The Wiring Problem C
A C-wire is usually blue. A thermostat without enough wire will require you to connect the wires from the new thermostat to the new thermostat. In other words, you have the correct quantity of cables for your new thermostat to function correctly. When installing a heat pump thermostat, you may also require a C-wire. A thermostat with more connections is more necessary for an air conditioning device than one with fewer connections.
Other Names and Wires for R-wire Clips
You can’t connect a single transformer to a single thermostat. A jumper wire (or copper tape) connects the RC terminal to the right if you only have one transformer. The red wires from the filament transformer terminate at the RH terminal. The red wire from the cooling system’s control transformer ends at the RC terminal. Besides, the RC terminal is the last stop for the red cable on the cooling system’s control transformer. The big question, particularly for beginners in HVAC, is whether to use a common ground or C-thread.
All neutrals are usually the same unless they’re too costly. It is advisable to rewire the transformers. Most transformers on either system can handle all of the controls on both systems.
Connect an Additional Thermostat to the Heat Pump Thermostat
Adding a second thermostat to a heat pump can be a great way to save energy and money. By connecting the two thermostats, the heat pump will only operate when both thermostats are calling for heat. It can be a great way to reduce energy consumption and costs.
Some systems require installation. Most residential layer systems are two-layer systems. In this scenario, you need a thermostat with a W2 connection and a Y2 connection. Some people typically use black for W2 and light blue for Y2 connections, which have distinctive colors. An emergency heating thermostat, a backup heat source, and a backup condensing unit are all possible uses for the W2 connection. It is sometimes referred to as a backup heater when the condenser malfunctions.
Tips on How to Wire a Heat Pump Thermostat
If you are looking to wire a heat pump thermostat, there are a few things you need to keep in mind. It’s handy to have thermostat cables. You can use red wires to power the R station and other colors. If the person who installed the thermostat didn’t follow the wire color code, it might have been because of who did the wiring. Before removing the old wires, photograph them and document them on the old thermostat’s base. Using your phone, photograph the wires for future reference.
Make sure the power is off before you start any wiring. If you don’t do this, the transformer may overheat or trip the LV circuit breaker, or the low-voltage fuse will light.
There are two ways to heat with a belt in a heat pump system. If you set the Emergency Temperature option, the heat pump turns off, but the belt becomes the primary heating system. You should only use this function for a brief period because it has a higher energy cost than a heat pump. The station is E.
Look for these features in a modern programmable thermostat.
- An error code describes why the system does not work correctly.
- The system will not work correctly until the compressor has been turned off for at least three minutes.
- The life of the compressor is shortened if the cycle is short.
- You can program the day and night settings for target temperatures.
- The weekend settings and vacation discount functions are available. You can check the thermostat status and control parameters remotely by smartphone or computer.
Conclusion
If you’re in the market for a new thermostat, you may be wondering how to wire a heat pump thermostat. While it may seem daunting, wiring a heat pump thermostat is reasonably straightforward. The most important thing to keep in mind is ensuring that the wires are connected to the correct terminals. Once you have the wires connected, you’ll be able to enjoy the benefits of a properly functioning heat pump thermostat.
FAQ
Does a heat pump require a special thermostat?
Heat pumps require a thermostat compatible with their technology to function correctly. While many thermostats on the market are compatible with heat pumps, some are not and could cause issues with the heat pump’s operation. It is best to consult with a professional to ensure that the thermostat you select will work appropriately with your heat pump.
Can you use a thermostat with a heat pump?
Heat pumps are an HVAC system that uses a compressor and evaporator to move heat. In heating mode, they are used most commonly in moderate climates and can operate in heating and cooling modes. The most significant thing to remember is that not all thermostats are compatible with heat pumps. To get the best performance from a heat pump, use a thermostat designed for use with a heat pump. It will help to ensure that your heat pump is operating at peak efficiency.
What happens if you wire a thermostat wrong?
If you wire a thermostat wrong, it can cause the furnace or air conditioner to turn on at the wrong time or not turn on. It can be a severe problem, especially in the winter, as it can cause the home to become very cold. If you think you may have wired your thermostat wrong, it is best to call a professional to come and take a look.